This article provides a comprehensive guide on how to convert JSON to DataTable in C#. It explains how to efficiently deserialize JSON to DataTable in C# in ASP.NET Web Forms using both C# and VB.NET. In addition, you'll learn how to convert a JSON string to DataTable in ASP.NET and how to work with JSON deserialization in C#.
The article also covers working with JSON in C# and provides insights into converting JSON to DataTable C# code, ensuring you understand every aspect of the JSON.NET DataTable process. Whether you're handling JSON data in ASP.NET Web Forms or dealing with C# DataTable examples, this guide will give you the tools to manage and manipulate JSON data seamlessly.
In my previous articles, I explored topics that may interest you, such as:
For many developers working with Web Forms or Web APIs, JSON data handling in C# is a critical skill. Even if you're familiar with the basics of C# JSON parsing, understanding how to deserialize JSON data into a DataTable or Dataset is often confusing. This guide will show you step-by-step how to convert JSON to DataTable in C# and VB.NET, along with the correct way to handle responses from Web APIs or Web Forms. By the end of this tutorial, you will have a clear understanding of how to convert JSON to DataTable in C#, making your applications more powerful and efficient.
Requirement
1) Create a New Asp.net web form Application with Bootstrap 4.2) Create JSON data.text file with JSON String.
3) Read JSON String from JSONData.text file and Convert JSON String into Dtatable or DataSet.
4) Bind Datagridview using Dtatable and Display records in the tabular format.
Implementation
Let's start to implement read JSON string from the text file and convert JSON data into Datatable and Dataset and Bind data table to datagridview step by step.Step 1: Open Your Visual Studio 2013 or higher versions.
Step 2: Go To File Menu and Create New Project and then Select "ASP.NET Empty Web Site", and Set project path location and Click on Ok.
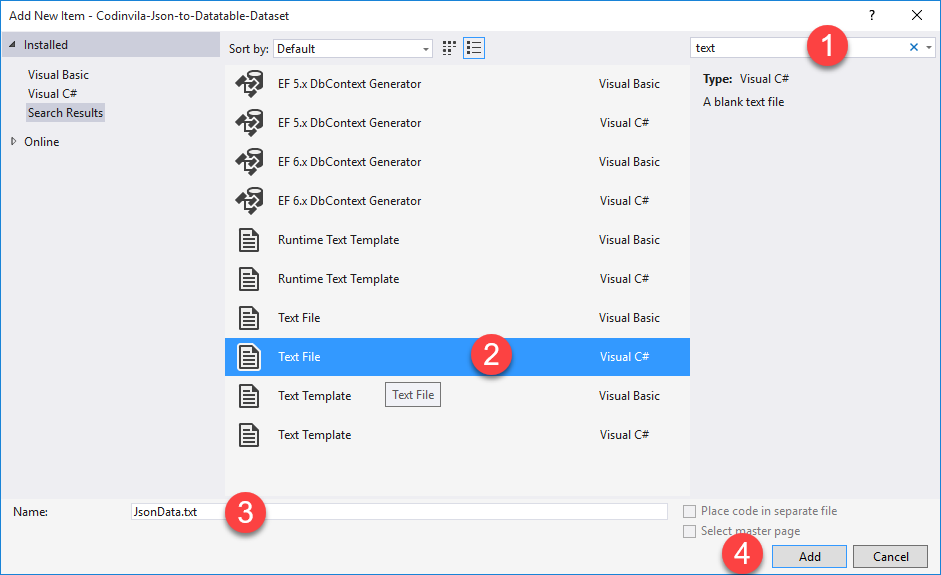
NOTE: Make sure The file extension of your web form is (.aspx)Step 5: Repeat Step 3 and Add the .text file with the name JSONData.text.
JSON String
{
    "OrderTable": [
        {
			"OrderNumber": "CO-00001",
            "CustomerName": "Nikunj Satasiya",
            "OrderDate": "24/03/2019",
            "ProductName": "Laptop-Lenovo",
            "Pcs": "1",
            "Amount": "35000",
			"CGST": "9% (3150.00)",
			"SGST": "9% (3150.00)",
			"IGST": "0% (0.00)",
			"NetAmount": "41300.00"
        },
		{
			"OrderNumber": "CO-00002",
		    "CustomerName": "Hiren Dobariya",
            "OrderDate": "24/03/2019",
            "ProductName": "Laptop-Dell",
            "Pcs": "1",
            "Amount": "45000",
			"CGST": "9% (4050.00)",
			"SGST": "9% (4050.00)",
			"IGST": "0% (0.00)",
			"NetAmount": "53100.00"
        },
		{
			"OrderNumber": "CO-00003",
		    "CustomerName": "Vivek Ghadiya",
            "OrderDate": "24/03/2019",
            "ProductName": "TV-MI",
            "Pcs": "1",
            "Amount": "13500",
			"CGST": "9% (540.00)",
			"SGST": "9% (540.00)",
			"IGST": "0% (0.00)",
			"NetAmount": "14580.00"
        }
    ],
    "CompanyTable": [
        {
            "CompanyID": "C-0001",
            "CompanyName": "Lenovo",
            "Branch": "Surat"
        },
        {
            "CompanyID": "C-0001",
            "CompanyName": "Dell",
            "Branch": "Rajkot"
        },
        {
            "CompanyID": "C-0003",
            "CompanyName": "MI",
            "Branch": "Jamnagar"
        }

    ]
}
Step 6: if you didn't have a reference of newtonsoft.json then you need to add newtonsoft.json from the NuGet Manager. and for that Go to Tools >> NuGet Package Manager and click on Package Manager console as shown in the screen below.PM> Install-Package Newtonsoft.Json
Step 8: After successful installation of the package you have to add the reference Newtonsoft.Json in your created web form (Json-to-Datatable-Dataset.aspx.cs) file.
<link rel="stylesheet" href="https://maxcdn.bootstrapcdn.com/bootstrap/4.3.1/css/bootstrap.min.css" />
<script src="https://ajax.googleapis.com/ajax/libs/jquery/3.3.1/jquery.min.js"></script>
<script src="https://cdnjs.cloudflare.com/ajax/libs/popper.js/1.14.7/umd/popper.min.js"></script>
<script src="https://maxcdn.bootstrapcdn.com/bootstrap/4.3.1/js/bootstrap.min.js"></script>
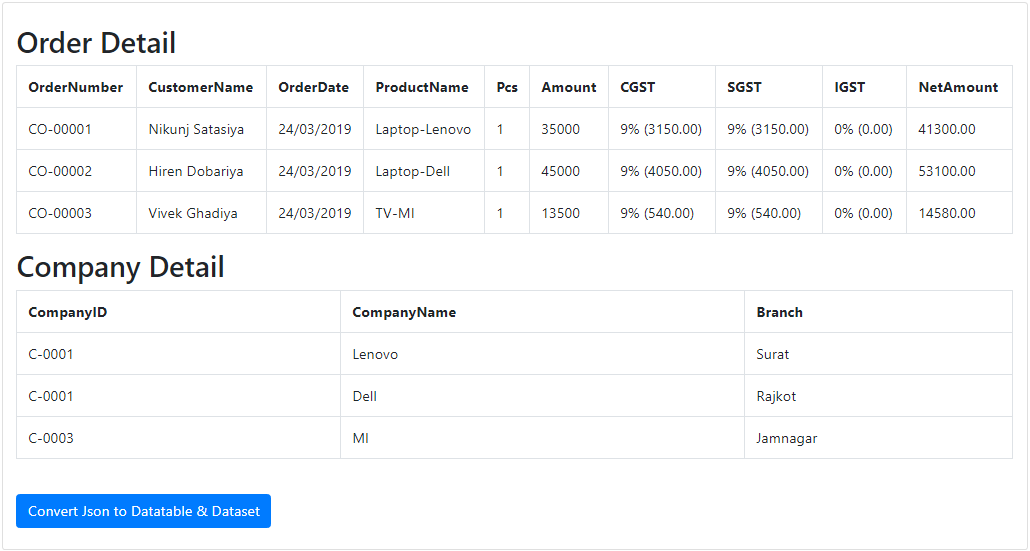
Step 10: Now you have to write the following code before the end <body> tag, here I have used two datagridview one for display data for Order Details and another for display data for Company Details and also for table one button. On click of control, we will convert JSON data into Dataset and Datatable and assign a data source to the appropriate datagridview and display the record in tabular format as per the given requirement.
<form id="form1" runat="server">
        <div class=" container card">
            <br />
            <h2>Order Detail</h2>
            <asp:GridView ID="grdOrderDetails" runat="server" CssClass="table table-bordered"></asp:GridView>
            <h2>Company Detail</h2>
            <asp:GridView ID="grdCompanyDetails" runat="server" CssClass="table table-bordered"></asp:GridView>
            <br />
            <div>
                <asp:Button ID="btnConvert" runat="server" CssClass="btn btn-primary" Text="Convert Json to Datatable & Dataset" OnClick="btnConvert_Click" />
            </div>
            <br />
        </div>
    </form>
Step 11: Then, You have to open the cs file of your web form (Json-to-Datatable-Dataset.aspx.cs) and you need to add the following required Namespaces.
C#
using System.Data;
using System.IO;
using Newtonsoft.Json;
VB.NET
imports System.Data
imports System.IO
imports Newtonsoft.Json
Step 12: Now, You have to write the following code in the click event of the btnConvert button.
C#
protected void btnConvert_Click(object sender, EventArgs e)
{
    //Read Json Data From Text File
     String Json = File.ReadAllText(Server.MapPath("~/JsonData.txt"));

     //Convert JSON Data to DataTable
     //DataTable myDataTable = JsonConvert.DeserializeObject<DataTable>(Json);


     //Convert JSON Data to DataSet
     DataSet myDataSet = JsonConvert.DeserializeObject<DataSet>(Json);


    //Check Table Count in DataSet
     if (myDataSet.Tables.Count > 0)
     {
         if (myDataSet.Tables[0].Rows.Count > 0)
         {
             //Bind Table[0] into grdOrderDetails GridView
             grdOrderDetails.DataSource = myDataSet.Tables[0];
             grdOrderDetails.DataBind();
         }
         else
         {
             grdOrderDetails.Visible = false;
         }
         if (myDataSet.Tables[1].Rows.Count > 0)
         {
             //Bind Table[1] into grdCompanyDetails GridView
             grdCompanyDetails.DataSource = myDataSet.Tables[1];
             grdCompanyDetails.DataBind();
         }
         else
         {
             grdCompanyDetails.Visible = false;
         }
     }

}
VB.Net
Protected Sub btnConvert_Click(sender As Object, e As EventArgs) Handles btnConvert.Click
        'Read Json Data From Text File
        Dim Json As String = File.ReadAllText(Server.MapPath("~/JsonData.txt"))
        'Convert JSON Data to DataTable
        'DataSet myDataTable = JsonConvert.DeserializeObject<DataTable>(Json);
        'Convert JSON Data to DataSet
        Dim myDataSet As DataSet = JsonConvert.DeserializeObject(Of DataSet)(Json)
        'Check Table Count in DataSet
        If (myDataSet.Tables.Count > 0) Then
            If (myDataSet.Tables(0).Rows.Count > 0) Then
                'Bind Table[0] into grdOrderDetails GridView
                grdOrderDetails.DataSource = myDataSet.Tables(0)
                grdOrderDetails.DataBind()
            Else
                grdOrderDetails.Visible = False
            End If

            If (myDataSet.Tables(1).Rows.Count > 0) Then
                'Bind Table[1] into grdCompanyDetails GridView
                grdCompanyDetails.DataSource = myDataSet.Tables(1)
                grdCompanyDetails.DataBind()
            Else
                grdCompanyDetails.Visible = False
            End If

        End If

    End Sub
NOTE: In this example I have Convert JSON data into Dataset, If you would like to Convert into Datatable then You Have to use Following code:
//Convert JSON Data to DataTable
DataTable myDataTable = JsonConvert.DeserializeObject<DataTable>(Json);
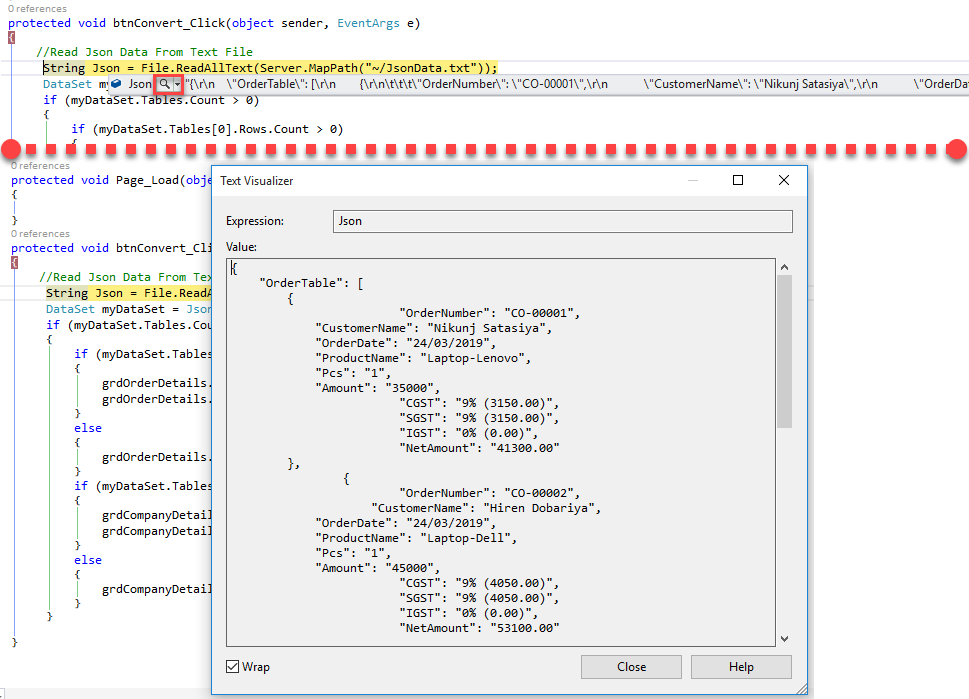
Step 13: While you run your application and debug the code you can see the following JSON data and returned Dataset as I have shown on the screen.
Output
Summary
This article gives an explanation about converting JSON to DataTable or DataSet in Asp.Net Web forms with Bootstrap 4 using C# and Vb.Net with Example.You can contact at info.codingvila@gmail.com, if you want source code or need any live support.
Price for Source Code: $21
Price for Live Support: $18 / hour


