This article gives an explanation of how to create an ado.net entity data model (EDM) in an asp.net MVC application using an entity framework as well as also explains what is entity framework, what is an entity data model (EDM), what is .edmx file and how to create .edmx file using entity framework data model in visual studio.
In my previous articles, I explain angular js cascading dropdown list using bootstrap 4, angularjs crud operation using web API 2 with a stored procedure, export dataset/datatable to CSV file using c# and vb.net as well as a split comma separated string in SQL server and many other articles that you may like to read.
Many of the developers and beginners who are working with the entity framework will have at least heard talk about the (EDM) entity data model and .edmx file, but I noticed still many of them do not have an idea about the entity data model and also didn't know how to create an entity data model in asp.net MVC application, so in this article, I'll explain what is an entity data model, how to create an entity data model in asp.net MVC application as well as basic information about the latest version and basic features of the entity framework and
Requirement
1) Explain what is entity framework?
2) What is the (EDM) entity data model?
3) Explain how to create an (EDM) entity data model in the asp.net MVC application?
Implementation
Entity framework
The entity framework is written in c# and it is an open-source object-relational mapper (ORM) framework supported by Microsoft. The first release of the entity framework is on 11 August 2008. The ORM (object-relational mapper) takes care of creating a connection with the database, executing commands as well as simplifying the mapping between the objects in your application to the tables, columns, and procedures of a relational database.
Entity data model (EDM)
The entity data model (EDM) is a set of concepts that describe data structures as well as that describes entities and the relationships between them.
So, let's see how to create an entity data model or create a .edmx file based on the existing database step by step.
Step 1: Open visual studio.
Step 2: Click on File >> New >> Website.
Step 3: Create a simple asp.net MVC application.
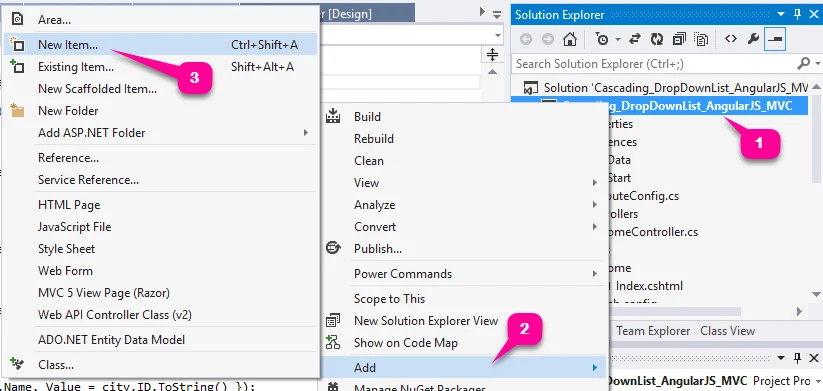
Step 4: Right-click on the name of the project from solution explorer as shown on the screen below and select Add >> New Item.
Step 5: While clicking on New Item one popup wizard will open on the screen where you have to select the ADO.NET Entity Data Model option and enter the appropriate name of the entity data model, make sure that the extension should be .edmx, and then click on Next button.
Step 6: While you click on the Next button system will launch the entity data model wizard where you have to select Generate from database option and click on the Next button as shown on the screen below.
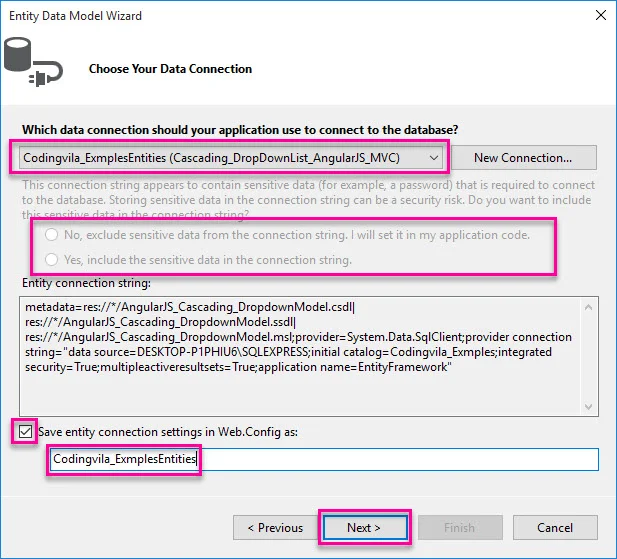
Step 7: In the Next wizard you have to choose your database connection where you can choose a database connection from a given dropdown selection or you can also create a new database connection.
As you can see on the screen above there are two radio selections that are there, which indicate where you want to include or exclude sensitive data from the connection string such as user, password and etc that you can choose as per your needs.
You can also see there one checkbox selection also there in the connection wizard that indicates whether you want to add created database connection string in the web.config file or not. you have to mark that checkbox field as checked if you want to add a connection string in the web.config file and then finally click on the Next button.
Step 8: Now you have to select database objects and settings and you have to select tables, view, or stored procedures by clicking on the available checkbox selection and clicking on Finish.
While you will open the web.config file then you can see created database connection string as shown in the code below.
<entityFramework> <defaultConnectionFactory type="System.Data.Entity.Infrastructure.LocalDbConnectionFactory, EntityFramework"> <parameters> <parameter value="v13.0" /> </parameters> </defaultConnectionFactory> </entityFramework> <connectionStrings> <add name="Codingvila_ExmplesEntities" connectionString="metadata=res://*/AngularJS_Cascading_DropdownModel.csdl|res://*/AngularJS_Cascading_DropdownModel.ssdl|res://*/AngularJS_Cascading_DropdownModel.msl;provider=System.Data.SqlClient;provider connection string="data source=DESKTOP-P1PHIU6\SQLEXPRESS;initial catalog=Codingvila_Exmples;integrated security=True;MultipleActiveResultSets=True;App=EntityFramework"" providerName="System.Data.EntityClient" /> </connectionStrings>
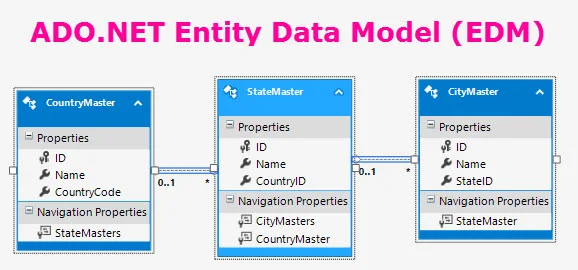
Step 9: Finally, Open the entity data model (EDM) designer by double-clicking on the .edmx file that shows all the entities for the selected tables and the relationships between them, as shown on the screen below.
Step 10: Done.
Summary
In this article, we learned how to create an ado.net entity data model (EDM) in the asp.net MVC application as well as basic information about the entity framework.


